Decorating your own garden plot is an activity that has become a favorite hobby for many. What ideas just do not find embodiment on six hundredths. After all, this is a great opportunity to show your creativity, sense of humor and surround yourself with objects that can deliver joy and aesthetic pleasure. Despite the abundance of crafts made of plastic and other artificial materials, wood and stones were and remain leaders in summer cottage art. These two materials look especially organically in any processing. We have already talked about how stones can be used in garden design, so today we will pay special attention to painting on stones with our own hands.
How to find suitable stones?
Choosing the right material is best done in the summer. And those who have already tried their hand at painting on stone, well know why. In the summer, many of us go to the sea, but choose not beautiful and alluring sandy beaches, but those places where there are pebbles. This is a real "Klondike" for artists. It is here right under our feet that material that we really need is literally lying around.

The advantage of sea pebbles is that it is so smooth that when working with it you can do without preliminary primer with PVA glue
The stones suitable for our venture are round or oval. Most often they are light, have a smooth surface and a flat base. If you come across an interesting instance, the form of which is not so simple, do not refuse it. It is enough to come up with an image that will correspond to this form, and will lie well on it.
The flat base of the stone allows it to occupy the most stable position on any surface. For a lawn, this quality is not so relevant, but if it is necessary to decorate smooth surfaces, then it will be in demand exactly the flat shape of the boulder. Armed with a creative approach, you can use other stones, for example, porous. Painted yellow, they will resemble pieces of cheese.
What if there are no stones needed?
If you had an idea, for example, to draw a lotus flower at different stages of its flowering, using cobblestones of different sizes, but there are no suitable stones, you can make them yourself.
To do this, you need to prepare a container (pot or basin) of the appropriate size, pour sand into it and wet it to keep its shape. Make a deepening in the sand of the shape that you would like to give to the future boulder. The recess must be lined with transparent polyethylene.

This stone made of cement fits perfectly into the surrounding landscape. They did not begin to decorate it, although it was not difficult to do it.
Mix the cement. If you want to get a stone of a certain color, you can add the appropriate pigment to the cement. Then you can put the resulting solution in polyethylene, and then tie the film. In whole economy, inside the stone can be made hollow.

It may make sense to pick the pebbles in size to use them to fold two wonderful snakes, but it’s much easier to make them yourself
Until the future stone is dry, its outer surface should be covered with sand 10-15 cm to avoid cracking. A large boulder is best done near its installation site. After the cement has completely dried, proceed to its painting.
Choosing the right paint
Brushes and paints are an important element of the work ahead. Undoubtedly, you have heard that acrylic paints are used to paint stones. Why acrylic? After all, there is also gouache, watercolor and oil paint.

Acrylic paints have many useful properties: they cover stones well, do not rinse with water, do not fade and tolerate a change in temperature
We prefer acrylic for the following reasons:
- these paints dry quickly and turn into an elastic coating that does not crack;
- acrylic lays well on the surface without slipping or absorbing;
- the colors of these paints are extraordinarily bright, they do not fade in the sun, do not become dull with time, and are not washed off by water;
- Acrylic coating is non-toxic and odorless.
The elastic film that acrylic paints form on the surface of the stone after drying is strong enough, resistant to mechanical stress, does not respond to high humidity and temperature extremes, and does not dissolve in water.
Acrylic paints are produced by both foreign and domestic manufacturers. It is necessary to choose those that would suit us not only with high quality, but also at an affordable price.

Gamma paints are very suitable for the first work of beginners: they are inexpensive, but quite solid, and their ability to darken after drying just needs to be considered
Consider several options:
- Art acrylic of the Gamma brand (Russia). This is an inexpensive material that can be used by novice artists. Its feature is that the picture after drying becomes darker by a couple of shades.
- Glossy paints "Decola" (Russia). Due to their richness and brightness, they are perfect for the image of flowers and plants. The glossy surface allows the picture to look more spectacular, but creates unwanted glare that is not needed by animal images.
- The Russian products of Ladoga and Sonnet are an excellent example of a normal ratio of quality and price. Due to the increased adhesion, the paint of the Ladoga series is well fixed on the stone and can withstand the change of temperature conditions. Acrylic of both series becomes darker after drying. To create additional effects, you can successfully combine the use of matte paints "Ladoga" and "Sonnet" and glossy "Decola".
- Pebeo paints of joint production between France and China and creamy acrylic "Vivace" are higher-level materials that are used by real artists, so you should look for them in art salons. They are not only easy to operate, but also do not change their shade after drying.
- Paints "Maimeri" and "Plaid" are not so easy to find, and they cost more than the previous ones. It should be remembered that under these trademarks they also sell materials for work on glass, metal and plastic. We need those that say "for work on cement or stone." If the stone will subsequently be in the garden, then acrylic should be for outdoor use.
- American Plaid FolkArt products will likely have to be ordered online. The drawings she creates will never darken. In addition to a large palette of colors in this series there are mediums - the means by which you can create various special effects.
- The Polycolor series of Maimeri paints (Italy) have continuous advantages. If you find them, and you are not afraid of the price, you will get every chance with their help to create something truly unique.
As you have already seen, there are many colors. Every artist from beginner to professional has the opportunity to choose what he likes.

Polycolor Italian paints make up a large series, which includes many different colors of excellent quality, durability and brightness
Which brushes work best?
If the paints are quite difficult to choose: you can just get confused in different names and buy, as a result, something is not right, then there should be no confusion with brushes. Usually they sell in sets of eight.
For stone painting, synthetic or nylon brushes are needed. The bristle products for this purpose will be too coarse, and natural materials, such as columns or squirrels, too fragile and soft.

If the brush becomes temporarily unnecessary during operation, it must be lowered into a glass of water so that it does not dry out
In the photograph, brushes are presented by numbers. Each brush from the set has its own purpose.
- No. 8 - is used to work on large boulders weighing more than 4-5 kg;
- No. 7 - for large stones. If you master the technique of one stroke, then this brush is useful to you for drawing flowers and leaves;
- No. 6 - useful for working with large stones, they can also draw leaves and flowers using the technique of a single brushstroke;
- No. 5 is a very convenient and quite universal brush, with it you can paint both large and small stones;
- No. 4 - an ideal brush for working with small stones;
- No. 3 - is used not only in work with small pebbles, but also for drawing details of drawings on large boulders;
- No. 2 - with its help they draw the smallest details of drawings - patterns, eyes, hair, hair and so on;
- No. 1 - necessary to create special effects, such as spot painting.
Now that we have stones, paints and brushes, and we know how to use them, it would seem that we can begin to do the work. But, a minute of attention, there is another point that needs to be clarified.
How to build a palette
One of the properties of acrylic that helps us in our work is its ability to dry quickly. But for beginning artists, this circumstance causes some difficulties. They have to draw faster than they can. In addition, you constantly have to add new paints, and this unnecessarily increases their consumption.
You can, of course, use special tools that slow down drying, but then the desired effect disappears, and creating drawings will be much more difficult.

As you can see, such a container is easy to find in any grocery store, so you should not have problems with the construction of the palette
Meanwhile, if the jar of paint is opened, and we begin to dip a brush into it, acrylic will quickly become a viscous, and then elastic, dense substance. Simply put, the paint dries and you have to throw out the whole jar. If you squeeze the paint on a regular palette, then its consumption will be huge, and that’s no good.
To work calmly, slowly and without spending extra paints and nerves, you need to make a special palette with your own hands. To do this, take:
- ordinary lidded plastic container;
- toilet paper or napkin;
- baking paper.
First, take a container of any size. Subsequently, when you already begin to draw regularly, you yourself will understand what size palette you need. The wider the container, the larger the color palette that you can use to paint the stones for your garden.
The small container that we chose is perfect if you need to paint small pebbles. At the bottom we put a piece of toilet paper or a paper towel. Tamp the paper lightly and fill it with water so that it is well saturated. The cloth should be wet, but not float in water.

In this homemade palette there are several drops of paint of different colors, which indicates a minimum consumption of material
Now you need to take the waxed paper and cut out from it a piece corresponding to the size of the bottom of the container. We put this paper on top of a wet towel. The work is completed, we have made the perfect palette for acrylic paints. Baking paper retains moisture and prevents paints from drying out. When closed, this palette can even be refrigerated if the painting process has to be interrupted.
Now it’s really time to start painting the stones.
Painting sequence
Stones should be prepared for work - rinse thoroughly with soap and dry. Then each stone must be primed with PVA glue and dried again. Now you can start applying the background. The color must be determined in advance, shake the paint well and apply it to the surface of the stone. After this, wait 15 minutes for the base layer to dry.

If it now seemed to you that you spend too much time while the stone dries, then this is not so: you can simultaneously prepare several more blanks
Before you make a drawing on a stone, make a sketch on paper, imagine how it will look ready-made. With a pencil, reproduce the drawing on the stone. Check again if all the details are well drawn. Subsequent coloring will be done in layers. Each element must be dried for 15 minutes. The contours of your painting are done with liquid paint.
It is best to dry the product on a battery. The finished product must be coated with a layer of protective varnish. He must also dry. After painting, you can put the finished stone in its place in the garden.
And look at the video - as they say, it’s better to see once:
What can be painted on the stone?
If you answer this question briefly, you can draw everything! Everything that you want and everything that tells you the imagination. But we still give some advice.
In addition to popular frogs, ladybugs, flowers, foliage and fish, you can draw a collection of emoticons. What they should be, you can always spy on the Internet.

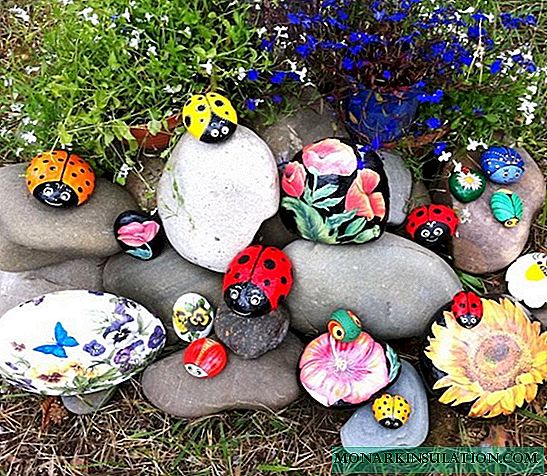
You can draw on a stone not only representatives of wildlife or a fictional hero, but also such a beautiful abstraction
A great idea is to create a whole collection of characters in a fairy tale or a popular cartoon. It can be the heroes of "Turnip", located on boulders of different sizes from the largest, which will be Turnip, to the small - Mouse. Smeshariki loved by everyone will look good on the playground.
Watch this video and we are sure you will get a lot of positive emotions and ideas:
Where is it better to use painted pebbles?
Now that we have figured out how to paint the stones that will be in the garden, we can begin to use them for their intended purpose. A variety of patterns can be applied to the stone. The scope of such a stone also depends on their content.

These wonderful animals painted on smooth stones look so natural and vibrant that they will become a real decoration of your lawn

Playing with the pebbles on which the numbers are drawn, the child will be able to easily and easily learn without counting pressure from adults.

But such a simple and, at the same time, very original sign will unobtrusively invite your guests to take a walk in the garden
To arouse your own imagination, we are ready to offer you some examples:
- At the pond. Near the pond, you can place large boulders by drawing beautiful Japanese carps, frogs, lilies or water lilies on them against a background of green leaves and other living creatures living in the water.
- Paths. Narrow paths or paths can be paved not with simple medium-sized cobblestones, but with pebbles with painting on them.
- Area. If there is a need to divide the paved area into different zones, you can use stones painted in different colors. They can form colorful spirals, be arranged in zigzags or depict an ornament. They also do the same with curbs and lawns: they are simply covered with colored pebbles.
- Pointers. The idea to put a large boulder at the crossroads with directional inscriptions was born a long time ago. Even Ilya Muromets came across such a pebble. Why not revive this tradition on your site?
- Game Zone. On a smooth surface of a pebble, you can apply not only a pattern or drawing, but also letters, syllables, numbers, or just crosses and zeros. If you place such toys on the playground, the child will always have something to do.
- Sculptures and sculptural groups. Colored or painted pebbles look great in the form of pyramids. Between them they can be glued with special glue.From flat copies you can make a real "gingerbread house".
- Decoration of vertical surfaces. Pergolas and fences, utility rooms and barbecue can be decorated with beautiful painted pebbles.
All possible directions for the use of such crafts is difficult to describe. They will undoubtedly be prompted by your own imagination.